Understanding Unity's Input Action Asset (Input System Package)
Unity UnityInputSystemUnity now has a much better system for handling player input with the introduction of the Input System package. This package includes much improved management of input controls and bindings, and that's done through an Input Actions Asset. This post goes over how to create one and how they work.
Quick Overview
Here's a quick overview of the whole system if that's what your looking for. Otherwise feel free to jump down to the detailed explanation below this section.
At the top level there are action maps, these are collections of actions that relate to a specific context in game (ex. menu navigation, running/shooting, driving...). An action represents an in game event that is triggered by player input (ex. selecting a UI button, moving, jumping...). Each action has one or more bindings that maps a specific control path and interaction to an action. Control paths are identifiers for the different input (buttons, sticks, triggers...) on a specific set of input devices and interactions are patterns of input that will trigger an action.
Additionally each binding can be a part of one or more control schemes. Control schemes are just collections of bindings that can be enabled and disabled all together, they can be restricted to only work with specific devices (ex. you can have different control schemes for mouse/keyboard and controller).
Finally there are processors, these just apply an operation on the input data (like invert the direction, normalize the value, apply a deadzone). They can be applied to an action or binding.
Now if that was too fast and you want more details, keep reading on...
Getting Started
ℹ - Make sure you have the new Input System Package installed first. (Installation Guide{:target="_blank"})
Creating an empty Input Action Asset is the same as any other asset, from the Assets menu or by right clicking in the project window go to Create -> Input Actions.
You can also create an Input Action Asset from a template that is already setup with a bunch of default actions. Create one by adding a PlayerInput component to a GameObject in the scene and clicking the Create button on the component, it'll ask you where to save the new asset. The new asset will include actions for navigating the Unity UI and a few gameplay actions that may or may not apply to your game. It's at least a useful starting point to then customize for your game.
Detailed Overview
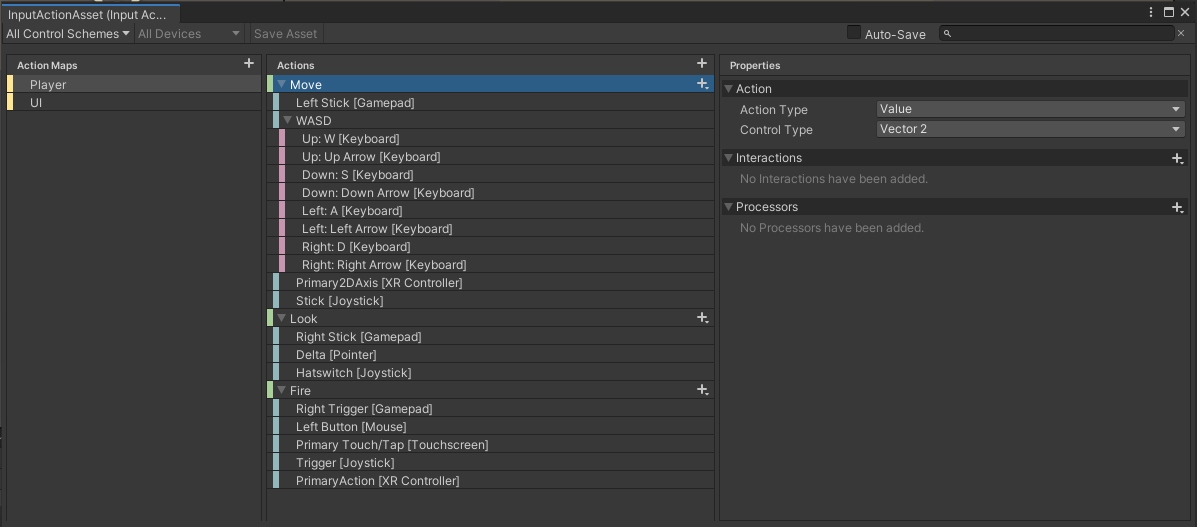
This is the window used to edit an Input Action Asset (double click on the asset to open it). It has 3 main panels and a few extra options at the top.
Action Maps
Action Maps are at the top level of the Input Action Asset, you can add/delete them from the left panel of the editor window. Each one is a collection of Actions that relates to a specific context in your game.
For example, if you were designing a first person game you might have an Action Map for when the player is walking around, another one for when controlling a vehicle, and a final one for when navigating the main menu or pause menu.
Actions
The center panel lists your Actions. You can add new actions by clicking the plus button at the top right of the panel. Each Action represents an event that the player can trigger in game from their input.
For example, in a simple driving Action Map you might have 3 Actions: accelerating, braking and turning. For a simple first person shooting Action Map you might have these 4 Actions: Move, Jump, Aim and Shoot.
When an action is selected, the right panel shows the actions properties. The Action Type determines, based on the input value, when the action callbacks are called (you can read more about the 3 options here) and the Control Type determines what kind of value the action uses. (Interactions and Processors are explained further down)
Bindings
Each action has one or more Bindings, they are the children of the Actions listed in the center panel. You can add a Binding to an Action by clicking the plus button on the right side of an Action. A Binding is a mapping from a specific input on a input device and an action.
For example, you might have a Binding under the jump Action for the space bar. If you want to support more than one control type you might have 2 bindings for the move action, one for the WASD keys on a keyboard and one for the left analog stick on a gamepad.
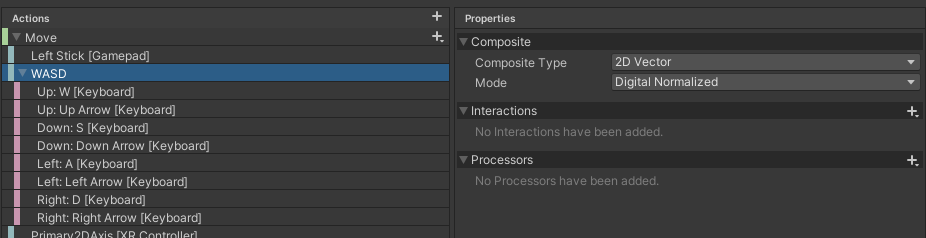
Actions can also have Composite Bindings that allow you to combine multiple bindings into one input.
For example, the WASD keys can be combined to produce a Vector2 value used by the move action. You could also use a Modifier Composite Binding so that an action is only triggered when you press a button while another button is also being pressed.
Control Paths

A Control Path is a specific or set of specific input controls. The editor gives you a handy popup window for selecting a control path but internally these are defined as strings. You can read more about how the control path string is defined here.
You can use a control path to select similar input from different devices. For example the control path <Gamepad>/buttonSouth selects the bottom most button on the right side of gamepads, this would include the X button on PlayStation controllers and the A button on Xbox controllers.
Control Schemes
Control schemes are collections of bindings that can be enabled and disabled together. In the properties of a binding you can choose which control scheme the binding is a part of.
For example, you can have multiple different control schemes on a gamepad for a player to choose from. You can also have separate control schemes on gamepad and mouse and keyboard that the player can switch between.
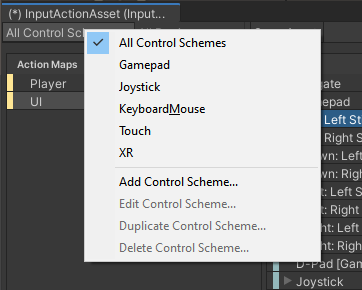
The control scheme menu allows you to select a control scheme to filter bindings out by. Once you select a control scheme, you can edit it's settings. In the settings you can require a specific device for a control scheme to be available.
For example, a Mouse and Keyboard control scheme should require that both mouse and keyboard devices be present. A touch control scheme should require that the device the player is playing on has a touch screen.
Interactions and Processors
If you have an Action or Binding selected you'll see the Interactions and Processors options in the right panel.
Interactions are an additional layer (to the Action Type) that determine how the code callbacks are called based on a value. You can use the Hold interaction for example to make a button action trigger only after it's been held for an amount of time.
Processors are operations you can apply to the value of an input. For example, you can invert the input of a button or add a deadzone to an analog stick.
Quick Reference
- Action Map: Input context (ex. Walking, Driving, Menu Navigation...)
- Action: In game event triggered by player input (ex. Jump, Move, Brake, Confirm menu selection...)
- Binding: Map from an Action to a Control Path (ex. space bar to jump, WASD or left analog stick to move...)
- Control Path: A path that represents one or a set of inputs from a device (ex. 'A' key on keyboards, R2 button on PS4 controllers, left analog stick on any gamepad)
- Control Schemes: Group of Bindings that should be active at one time (ex. all Bindings that use controller input, all Bindings that use mouse and keyboard input)
- Interactions: A pattern of input needed to trigger an action (ex. holding a button down for 3 seconds, quick tap of a trigger...)
- Processors: An operation applied to an input value (ex, invert, clamp, axis deadzone, normalize, scale...)
Conclusion
Hope that helps you understand the Input Action Asset or at least makes things more clear. Now you should be able to create an Input Action Asset and start using it. If you have any feedback or questions please leave it in the comments below, otherwise see you in my next post!
Comments
Join the discussion by leaving a comment on this GitHub Issue.